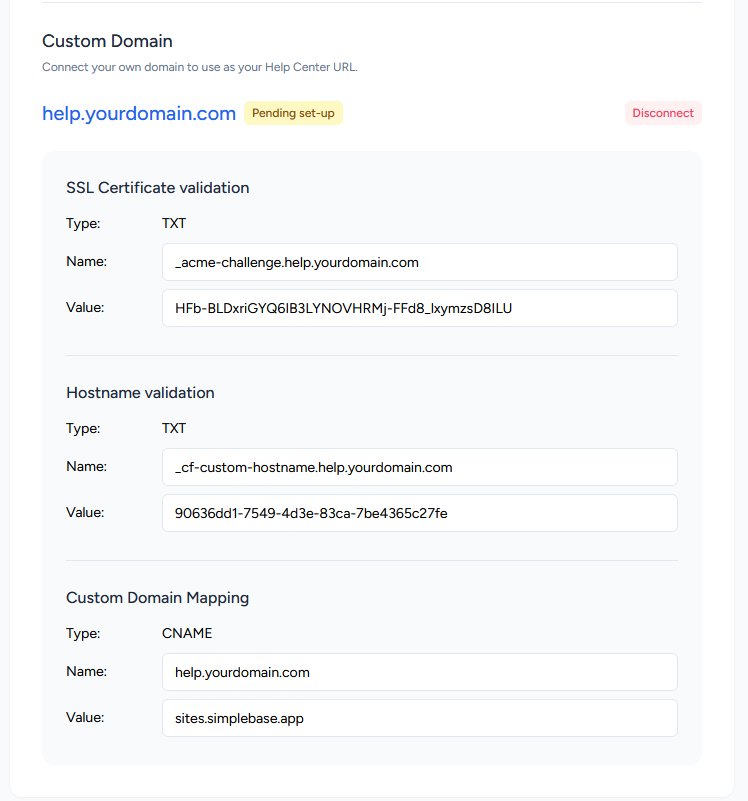
Connect your own domain to use as your Help Center URL.
SimpleBase has got you covered when it comes to customizing your knowledge base. By default, your pages are connected to a default SimpleBase subdomain, but you can switch it up and connect to a custom domain or subdomain.
Adding a Custom Domain
Connecting a custom domain to your SimpleBase knowledge base is easy. Here are the five easy steps you need to follow:
- Pick a domain registrar (GoDaddy, Namecheap, Google Domains, CloudFlare etc.) and purchase a domain from them.
- Head to your SimpleBase knowledge base settings, navigate to the "Domains" tab, and add your new domain in the "Custom Domain" area.
- Edit your domain's nameservers to change your DNS settings.
- Create a CNAME and TXT record to point your custom domain to your SimpleBase knowledge base.
- Verify your custom domain records, and you're all set!

Create required DNS records
Once you have clicked to the Connect Domain button you will get some instructions on how to set up some DNS records. Add these DNS records to your domain provider.

You'll need to log into your domain account to start. You'll create a couple of records called a CNAME and a TXT. The CNAME record shows browsers where they can find your site when people visit your URL, while the TXT record helps us ensure you're the domain's rightful owner.
Finding your DNS settings
You'll need to look for the Domain Name Settings (DNS) for your domain. It may be hidden under a section called "manage domain" or something similar, depending on your domain provider.
Creating a new DNS record
Look for an option in a menu with a title like:
- Zone Settings
- Zone Editor
- DNS Zone File
- Advanced DNS
Setting up your CNAME record
This is where you'll need a subdomain name. Think of it as a prefix to your main domain name - like "www" in "www.yoursite.com". What you choose for the subdomain name will determine the URL for your SimpleBase knowledge base.
- Type: Keep it as CNAME.
- Name:
- "www" for a custom domain (e.g.,
- "help", "learn", or anything else for a custom subdomain (e.g., help.yoursite.com)
- Value: Enter "sites.simplebase.co".
- TTL: This refers to Time to Live. We suggest leaving it as is (default).
Setting up your TXT record
Adding a new TXT record to your DNS control panel is easy! Just follow these steps:
- Choose TXT from the dropdown menu.
- Copy and paste the "Name" and "Value" from the Customization section of your Dashboard
- For TTL, we suggest keeping the default setting.
You've just set up your DNS records. We'll take it from here and verify the connection.